
WHAT IS HOME AUTOMATION:
Home automation is part of "The
Internet of Things," also known as IoT. The way electronics devices and
appliances can be networked together to provide us with seamless control over
all aspects of our home and more. By using this technology we can easily
operate all the home appliances and can save power consumption.As we can
Operate it Through our Smartphone so it called as smart automation.


INTERNET OF THINGS (IoT):
Before we know about Home Automation, we must know about what is Iot,
The Internet of Things refers to the ever-growing network of
physical objects that feature an IP address for
internet connectivity, and the communication that occurs between these objects
and other Internet-enabled devices and systems such as Sensors and Actuators.
ELEMENTS REQUIRED FOR HOME-AUTOMATION:
·
Arduino UNO
·
HC – 05 Bluetooth
Module
·
10 KΩ Resistor
·
20 KΩ Resistor
·
1 KΩ Resistor X 4
·
2N2222 NPN Transistor
X 4
·
1N4007 Diode X 4
·
12 V Relay X 4
·
Prototyping board
(Bread board)
·
Connecting wires
·
12 V Power supply
·
Smartphone or tablet
(Bluetooth enabled)
WHAT IS AURDINO UNO:
Arduino consists of both a physical programmable circuit board
(often referred to as a microcontroller) and a piece of software, or IDE
(Integrated Development Environment) that runs on your computer, used to write and
upload computer code to the physical board.

- Arduino can be used to communicate with a computer, another Arduino board or other microcontrollers.
- The ATmega328P microcontroller provides UART TTL (5V) serial communication which can be done using digital pin 0 (Rx) and digital pin 1 (Tx). An ATmega16U2 on the board channels this serial communication over USB and appears as a virtual com port to software on the computer.
- The ATmega16U2 firmware uses the standard USB COM drivers, and no external driver is needed. However, on Windows, a .inf file is required. The Arduino software includes a serial monitor which allows simple textual data to be sent to and from the Arduino board.
- There are two RX and TX LEDs on the arduino board which will flash when data is being transmitted via the USB-to-serial chip and USB connection to the computer (not for serial communication on pins 0 and 1).
- A SoftwareSerial library allows for serial communication on any of the Uno's digital pins. The ATmega328P also supports I2C (TWI) and SPI communication. The Arduino software includes a Wire library to simplify use of the I2C bus.
HC-05 BLUETOOTH MODULE:
HC-05 Bluetooth Module is an easy to use Bluetooth SPP (Serial
Port Protocol)module, designed for
transparent wireless serial connection setup. ... HC-05 Bluetooth module provides
switching mode between master and slave mode which means it able to use neither
receiving nor transmitting data.
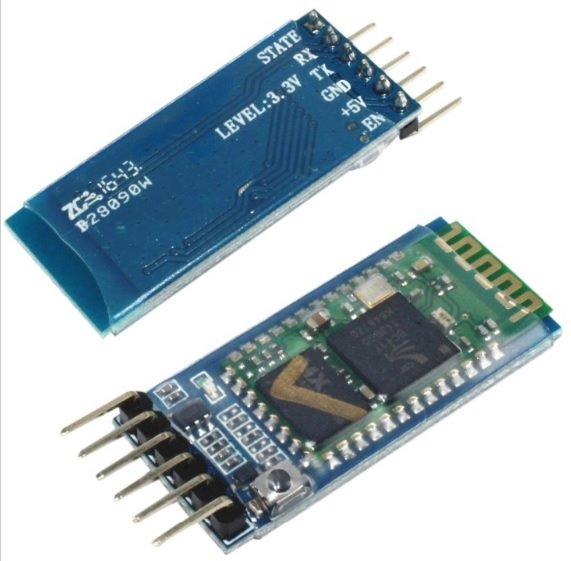
WHY WE PREFER BLUETOOTH OVER REMOTE:
It is preferable to use bluetooth because now a days people have their smart-phones with them all the time ,since smart phone have bluetooth facility in them,thus it is better to use bluetooth rather than using RF remotes or IRremotes.
ADVANTAGES:
- It is secure
- Easy to use
- It works in short distance range(10mtr)
- Anyone can find free bluetooth app in android and many more
ELECTRIC RELAY SWITCH:
Relays are switches that open and close circuits
electromechanically or electronically. Relays control one electrical circuit by
opening and closing contacts in another circuit. As relay diagrams
show, when a relay contact is
normally open (NO), there is an open contact when the relay is not
energized.
 Relay protects electrical circuits from overload andfaults.

HOW IT WORKS:
Project Module:
- Hardware-Microcontroller,bluetooth module,relay,diver ic
- Software-Android
BLOCK DIAGRAM:

CIRCUIT DIAGRAM:

After making circuit connection as per the fig above compile the arduino program given below in Arduino IDE and upload program to your Arduino Uno using USB B type data cable. Power up your Arduino using 9v DC adapter. After power up your circuit the lrd on Bluetooth start to blink very fast, it means the Bluetooth device waiting to be pair. Now connect your mobile to HC05 using Bluetooth Controller app. After connecting your mobile to HC05 turn ON and OFF the lights using respective keys.
CODE FOR AUTOMATION:
#include <SoftwareSerial.h>
const int rxPin = 4; // defining pin4 as a rx(receiver) pin
const int txPin = 2; // defining pin2 as a tx(transmitter) pin
SoftwareSerial mySerial(rxPin , txPin);
const int Loads[] = {9, 10};
int state = 0;
int flag = 0;
void setup()
{
for (int i=0;i<2;i++)
{
pinMode(Loads[i], OUTPUT);
}
mySerial.begin(38400);
for (int i=0;i<2;i++)
{
digitalWrite(Loads[i], LOW);
}
}
void loop()
{
if(mySerial.available() > 0)
{
state = mySerial.read(); // Reading Input From "Bluetooth Controller" app
flag=0;
}
switch(state)
{
case '0':digitalWrite(Loads[0], HIGH); // turn ON light1
flag=1;
break;
case '1':digitalWrite(Loads[0], LOW); // turn OFF light1
flag=1;
break;
case '2':digitalWrite(Loads[1], HIGH); // turn ON light2
flag=1;
break;
case '3':digitalWrite(Loads[1], LOW); // turn OFF light2
flag=1;
break;
case '4':digitalWrite(Loads[0], LOW); // turn OFF light1
digitalWrite(Loads[1], LOW); // turn OFF light
flag=1;
break;
}
}
STEPS :
- Connect Your Arduino to Computer
- Copy paste the Home_auto.ino file or open with the Arduino IDE
- Upload the code to Arduino
- Connect Arduino to 9v battery or computer
- Install the App in your Phone
- run the appliaction
- allow the BT permissions ,
- Type Your BT Module name (Normally HC-05)
- Password = 1234
- pair ok
BLUETOOTH MODULE APP:

Thank you..
")


0 comments: